Booking/Appointment Screen
The Appointment Screen
Features

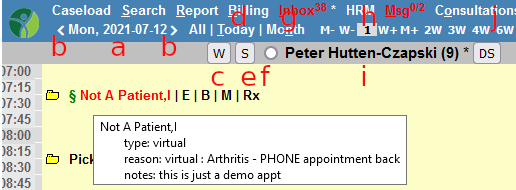
- Hovering the cursor over the patient’s name will show the reason for the appointment and any notes made regarding the appointment. When the cursor turns to a hand, clicking on the patient’s name will display notes and reason for visit.
- Clicking the patient’s name will open the ‘Edit Appointment’ screen to make changes and updates
Printing the Day Sheet
Although rarely used in this day and age of computers everywhere in the office, you can still easily print a daysheet of the OSCAR schedule:
Clicking “DS” button will print the daysheet for the selected doctor’s schedule
![]()
Depending on your OSCAR version, the Daysheet function may need to be enabled in oscar.properties (contact your OSP to enable daysheet function from schedule screen). If you can’t get the DS button on the schedule screen enabled, click on “Report” from the schedule screen and then there will be several options for Day Sheet for the selected doctor:

Week View
Clicking “W” button will bring up the WEEK VIEW of the selected doctor’s schedule
![]()
If you are on OSCAR PRO, in preferences you will have an option to set whether week view includes Saturday/Sunday (by default it’s only weekdays)
Appointment Slot Lookup
OSCAR has a quick and handy way to lookup the next available appointment slots very easily for a selected provider.
Pressing the “S” button from the schedule screen will bring up the appointment slot lookup.

As per screenshot above:
- Click “S” from the schedule screen to S(earch) the schedule.
- The doctor’s name from the schedule is pre-selected, although you can change this from the “Provider” dropdown
- Select the criteria to search (default is any weekday from 9am-5pm, with any appointment time, and 3 results)
- Press “Search”
- Select a timeslot to bring up the appointment booking screen for THAT selected timeslot.
This is the faster method of looking up timeslots (the slower method is manually switching the schedule day by day until you find an opening).
The “Appointment type” is a dropdown of appointment slot types (set via Schedule Setting in Administration) applied to the doctor’s schedule. A schedule needs to be set for the provider first.
High Contrast Option

At your option (Administration > Schedule Management > Display Settings > Show Classic Schedule) you can switch to a higher contrast version of the schedule screen familiar to long time users.
Filtering Schedule Views

You can filter the schedules using the controls on the far right
- You can search by the Last Name of the Provider or Group name
- If multi-sites are enabled you can filter by bookings for a given site (here it is set to show all clinic sites)
- You can search by Schedule group (set in Administration > Schedule Management ). The default is the current logged in user
Booking Appointments
There are a few ways to navigate to the date for when you need to book an appointment.
Choose one of the following:

- a) Click on the date on the upper left corner to open a calendar and choose the appropriate date (the small calendar is an optional feature controlled in Administration > Schedule Management > Display Settings )
- b) Advance a day at a time with the arrow on either side of the date in the upper left corner of the screen
- c) Click on the W(eek) button to show the week view
- d) Click on Today to return to the current date
- e) S(earch) with the search button to open a search dialog. To search the provider’s schedule, a schedule needs to be set for the provider first.

- f) Click the flip radio button to show the next few weeks of slot availability

- g) Click for the Month view (see Check Schedules below)
- h) Adjust the multiplier (defaults to 1) and click on your choice of -M -W +W +M to quick move that number of weeks or months.
- TIP: Week advancement keeps the same weekday, while month advance keeps the day of the month the same adjusting for weekends (this is an optional feature controlled in Administration section)
- i) Double click the provider to get the flip view
- j) Click on the static week month and year buttons TIP: Week advancement keeps the same weekday, while month advance keeps the day of the month the same adjusting for weekends (this is an optional feature controlled in Administration section)
With the date picked (or directly from the flip view) you just click on a time slot
After Selecting the Appointment Slot

- In the NAME box, type the patients phone number, hin or part of the patients last name and click the SEARCH button or hit the enter key
- From the list generated, click on the grey demographic number for the desired patient (TIP if there is only one demographic found in the search it will be selected automatically)
- TYPE will yield default values for DURATION REASON RESOURCES and LOCATION
- The DURATION box will default to the time associated with that template and can be changed to any other length of the appointment desired.
- CRITICAL will flag the appointment visually with an exclamation mark
- Fill in the reason for the appointment and click ADD APPOINTMENT
Booking Meetings
- Type the meeting information where you would put the patient’s name and save in the same way that you would save a booked appointment. If you do not click the SEARCH button, the program assumes you are booking a meeting and will put a period in front of the first word. TIP clicking the Do Not Book button will set the appointment with that heading
- Enter the Date and start time of the meeting.
- Clicking on the desired time will open a window to enter meeting details
- Fill in the remainder of the information and click ADD APPOINTMENT to add to the appointment screen
Booking Group Appointments
- Select a group that includes all of the providers that you are going to need for this appointment (top right hand corner of the screen)
- Open the make an appointment screen which ever way you prefer.
- In the NAME box, type part of the patients last name and click the SEARCH button or hit the enter key
- From the list generated, click on the grey demographic number for the desired patient
- TYPE will yield default values for DURATION REASON RESOURCES and LOCATION
- The DURATION box will default to the time associated with that template and can be changed to any other length of the appointment desired.
- CRITICAL will flag the appointment visually with an exclamation mark
- Click ADD GROUP APPOINTMENT

- Select the providers you want involved in this appointment by clicking the check box in the second column, beside their name or click the ‘check all’ link at the bottom. This will make the appointment with a number of people, but with only one person able to do billing and encounter notes.
- Click ADD GROUP APPOINTMENT again and all the providers you checked off will have the same appointment with the same patient at the same time
- Finish by clicking add appointment
Double Bookings
If you click on a time which is already booked, this creates a double booking. OSCAR will warn you that you are about to make a double booking. The background bars in the ‘Make an Appointment’ window will turn yellow and a message at the top of the window will say ‘Double Booking’.
Repeat Bookings
If you wish to book multiple appointments for the same reason Click the R button on the lower right corner of the Make an Appointment screen

- Choose the time interval between appointments (number of days, weeks, months, or years), and the end date (the last date you want the repeated appointment to occur on)
- Click add recurring appointment
Deleting an Appointment
- Click once on the patient’s name
- At the bottom of the EDIT APPOINTMENT screen click on DELETE APPOINTMENT
Changing the Appointment Status
- Click once on the icon to the furthest left of the patient’s name
- As you continue to click on the changing icon, you progress to the next appointment status in the loop
OR

- Click on the patients name to open the edit appointment screen
- Either select the Status from the Status selector
- OR Click on the Cancel or Delete or No Show buttons
Patient’s Master Demographic
- If the patient has an appointment, click on the ‘M’ icon beside the patient’s name in the appointment screen
- OR click on the SEARCH tab, type the patient’s name in the box and click SEARCH to get access to the Master Demographic Record
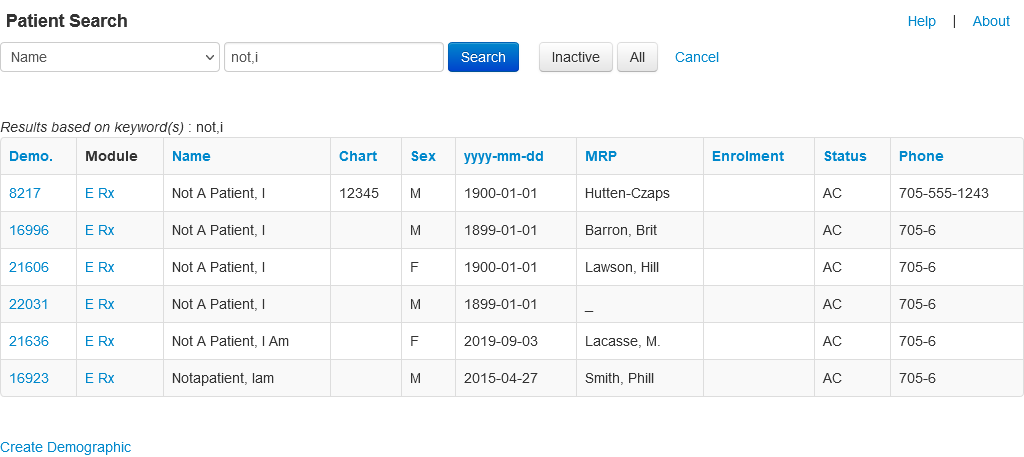
Searching for a Patient
The Search Tab is used to search the database for a specific patient’s Master Demographic record which has many office functions, including booking an appointment.
- From the Appointment screen, click on the ‘SEARCH’ tab
- The program will default to a ‘NAME’ search
- Type in part of the patient’s last name, then a comma and then the 1st initial of the patient’s first name
- Click the ‘SEARCH’ button or press the ‘ENTER’ key
- When the list of names come up, click on the ‘Demographic No’ button to bring up the Patient Master Demographic information
- Clicking on any of the headings will cause the list of results to sort on that heading
TIPS:
- You can search by Date of Birth, Name, Health Card Number, Address, Phone Number or Chart Number.
- For a general search, leave the search box blank and click the SEARCH button to get the full list of patients in the data base.
- The fewer amount of characters that you type in for the search, the better chance you have of finding the patient without a typo error.
- Apostrophe’s need to be escaped \’ as in O\’ Sullivan
- Clicking on the day tab will automatically return to the current day.
Check Schedules

- From the Appointment screen, switch to the group you want by clicking on the arrow beside the Groups box in the upper right corner of the screen
- Select the desired group
- Click on the ‘MONTH’ tab
- This will show you which providers are in on each day of the month
- The program will default to the current month at the top with the previous month and the next month below the current month
Common Issues
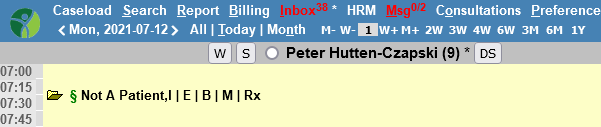
Help! The schedule is showing a totally dark green or blank screen and appointments aren’t showing!
You may have seen something like this:

The fix is to press the “All” button (it is between Calendar and Today buttons).
If you have selected “Schedule” (usually selected by default), then OSCAR will only display schedules with schedule templates setup. This is useful if you’re looking at a schedule group or week view and want to filter out days to only when doctor(s) are scheduled (aka schedule templates applied). By pressing “All” you tell OSCAR to show you ALL the contents of the schedule, not just “scheduled” schedules (that have templates applied). You’ll notice that after you press “All”, the button will rename to “Schedule” (it’s a toggle so you can switch back to seeing only scheduled schedules).
Documentation copyright © 2012-2024 by Peter Hutten-Czapski MD and Adrian Starzynski under the Creative Commons Attribution-Share Alike 3.0 Unported License