User Preferences
How to get to the User Preferences Section
- Click on ‘Preferences’ tab on the main schedule screen
- This opens a window where you can update a given users’ preferences.
Update Preferences
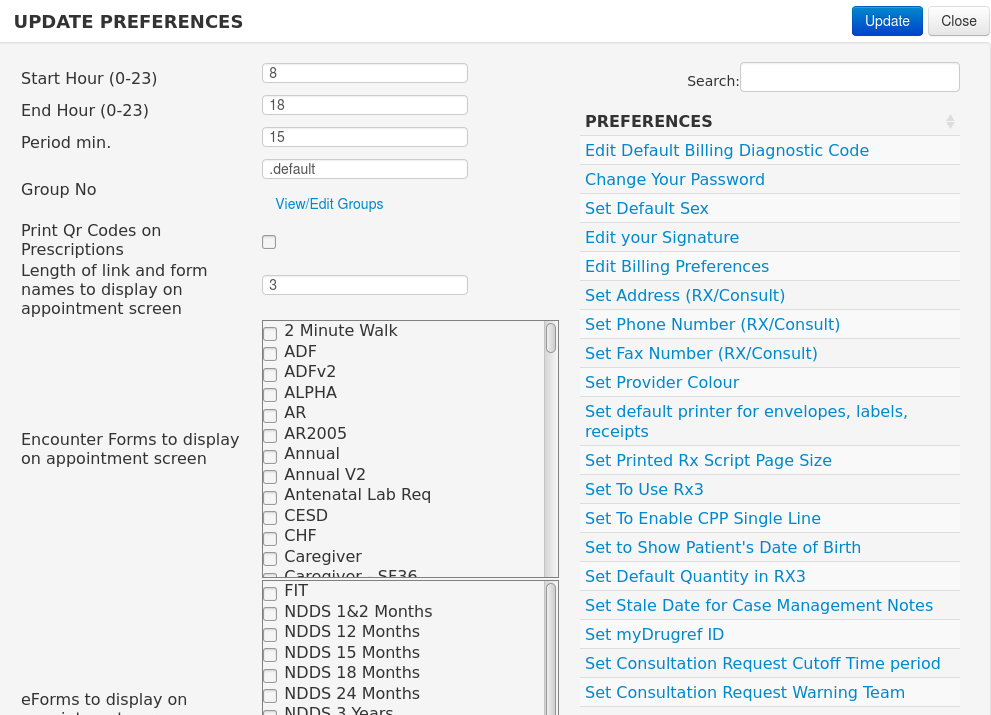
Schedule Settings
You can edit the start hour, end hour, and period of the displayed schedule here.
TIP
- if different providers in the same group book different time slots eg 10 min and 15 min slots, then set the period to a common denominator eg 5 min
View/Edit Group
Usually Administrators will assign providers to groups via Administration > Schedule Management > Search/Edit/Delete Groups
Individuals can access the same functionality via the preferences in View/Edit Groups link if they have privileges to do so
Any of the following privileges would do
- _admin
- _admin.schedule
- _admin.schedule.curprovider_only
These rights can be assigned to the provider in Administration > System Management > Assign Role/Rights to Object
The least right to access this functionality is _admin.schedule.curprovider_only
To customize your appointment screen view by creating a group of people that you will be working with.
- Click on the Preference Tab
- Click on the button “View/Edit Groups”
To add a person to an existing group
![]()
- Note the name of the schedule group to which you want to add a name
- At the top of the window click on the “New Group/Add a Member” button
- Type in the name of the group in the box at the top right of the screen
- Click the check box beside the person’s name that you want to add to the group
- At the bottom of the window, click SAVE
To create a new group
- At the top of the window click on the “New Group/Add a Member” button
- Type in the name you want the group to be called in the box at the top right of the screen
- Click the check box beside each name that you want to add to the group
- At the bottom of the window, click SAVE
Print QR Codes
QR Codes are essentially two-dimensional bar codes. They allow scanners to read in information by scanning a square barcode that looks like a square picture of dots. OSCAR can add barcodes to prescriptions that code the information in the Rx for faithful entry into some pharmacy systems.
Before you use this feature you should probably talk to your system administrator so they can help configure the QR Codes parameters appropriately for your printer/scanners etc. For QR Codes to be useful a third party will need to scan them in. Your system administrator should also be able to help communicate the format of the data in the QR Code to that third party.
The enable QR Codes, open your “preferences” screen, you should see an option for “Print QR Codes On Prescriptions”, check that box. When you print or reprint a prescription, you should now see one or more QR code images near the bottom of the prescription.

Length of Link and Form Names to Display on the Appointment Screens
This gives the length (including the period) of the characters that show as the link for the form or eForm on the appointment screen
eForms to Display on the Appointment Screen
This provides a direct link to the specified forms and eForms from the appointment screen
Quick Links to Display on the Appointment Screen
This allows you to enter a custom URL that can be linked directly from the appointment screen.
- Enter the name for the link and the URL
- Click Add to save
For example, if you wanted a quick custom link to the “Add Document” screen you would put this in the Url field:
${contextPath}/dms/documentReport.jsp?function=demographic&doctype=lab&functionid=${demographicId}&mode=add
See Preferences Quick Links for more examples.
Rx Interaction Level
This allows you to set the minimum level of Drug-Drug interaction warning that you want.
TIP:
- Set it too high and you may miss some important interactions. Set it too low and you will train yourself to ignore
Select When You Want to Receive Review Messages
Pick from the dropdown for the hour
Open In Tabs

This allows for OSCAR to open in browser tabs rather than new windows. When selected, most large windows will open in tabs with the exception of when several windows need to be open at the same time for optimized workflow (e.g. opening the Rx window on the document screen which may contain a renewal request)
Edit Default Billing Diagnostic Code

This sets a default diagnostic code for the billing screen. If you are an Obstetrician then setting a diagnosis of 650 or pregnancy will be useful here. The diagnostic code is only a default. You will be able to override it when billing.
Change your Password

- In the appointment screen, click the ‘Preference’ tab
- Click on the ‘Change Your Password’ link
- Type your current password in the top box
- Type your new password in the 2nd box
- Re-type your new password in the 3rd box
- Click on the UPDATE button
Set Default Sex

This sets the default gender for new demographics. If your practice is predominantly of one gender (eg OB/GYN) then you may want to pre-define the gender here. It is only a default. You will be able to override it .
Edit your Signature

Use this feature to edit the signature on the Prescription writing forms and how you sign your notes and prescriptions
- In the appointment screen, click the ‘Preferences’ tab
- Click on the ‘Edit your Signature’ link at the bottom of the window
- The top line tells you what you are signed in now
- Click on the “here” link to display a text box
- Type in your desired signature into the text box and click on the ‘submit’ button
- Click on the X to close the next 2 windows
NOTE: If you haven’t yet created a signature, you should see the text, “You do not have a Signature set”
Upload Signature Stamp
This option may be called “Set Signature Stamp” in some systems.

To start you won’t have a signature stamp set. Create one by following these instructions: Signature Image File. Save it to a suitable format (.png) and then upload it with the dialog

If desired you can Remove the Signature (it unsets it) or browse and update to a newer signature which will replace it.
Edit Billing Preferences

- In the appointment screen, click the ‘Preferences’ tab
- Click on the ‘Edit Billing Preferences’ link at the bottom of the window
- Select the default billing form that best meets your needs
- The other forms will remain accessible
Set Address (RX/Consult)

This sets the address used for the clinic in OSCAR
- Enter in the Address, City, Province and Postal Code
- Select Submit
Set Phone Number (RX/Consult)

This sets the phone number displayed on printed prescriptions
- In the appointment screen, click the ‘Preference’ tab
- Click on the ‘Set Phone Number’ link at the bottom of the window
- Enter your number in the following format 123-456-7890 and press submit
Set Fax Number (Rx/Consult)

This sets the fax number displayed on printed prescriptions
- In the appointment screen, click the ‘Preference’ tab
- Click on the ‘Set Fax Number’ link at the bottom of the window
- Enter your number in the following format 123-456-7890 and press submit
Set Provider Color

- In the appointment screen, click the ‘Preferences’ tab
- Click on the ‘Set Provider Color’ link at the bottom of the window
- Click on the palette.
- Choose your color – its the color of the top bar of the encounter/chart for your patients
- Click Accept
Set Default Printer for Envelopes, Labels and Receipts
Obsolete
Set RX Script Page Size

Rx3 has to be set for this preference to be relevant
- In the appointment screen, click the ‘Preferences’ tab
- Click on the ‘Set Rx Script Page Size’ link at the bottom of the window
- Select your preferred paper size from the drop down menus.
- TIP: A4 is a standard metric letter size. A6 is a quarter of that size, approximately the size of a postcard dimension wise.
- Click Save
Set to Use Rx3

- In the appointment screen, click the ‘Preference’ tab
- Click on the ‘Set to Use Rx3’ link at the bottom of the window
- Click the check-box labelled ‘use Rx3’
- Click Submit
Set to Enable CPP Single Line

- In the appointment screen, click the ‘Preference’ tab
- Click on Set to Enable CPP Single Line
- Click the box to enable
- When you are done select submit
Show Patients Date of Birth

- In the appointment screen, click the ‘Preference’ tab
- Select Set to Show Patients Date of Birth, this will show the Patient’s Date of Birth on their prescriptions
- Select Submit when finished
TIPS:
- This is a potential safety feature to allow the Pharmacist to check for age appropriate dosing
- Should always be enabled since most pharmacies need the patient’s DOB to show on the Rx
Set Default Quantity in RX3

- n the appointment screen, click the ‘Preference’ tab
- Click on the ‘Set to Default Quantity in Rx3’ link at the bottom of the window
- Enter a number
- Click Save
TIPS:
- Rx3 has to be set for this preference to be relevant
Set Stale Date for Case Management Notes

- In the appointment screen, click the ‘Preferences’ tab
- Click on the ‘Set Stale Date for Case Management Notes’ link at the bottom of the window
- Set how many months in the past before a Case Management Note is fully visible
e.g. Set to 6 will display fully all notes within the last 6 months - Notes older than the setting will still be visible if you click on them to reveal the content
- Click Save
Set myDRUGREF ID

- In the appointment screen, click the ‘Preferences’ tab
- Click on the ‘Set MyDrugref ID’ link at the bottom of the window
- Enter your Login ID
- Click Save
Set Consultation Request Cutoff Time Period

- In the appointment screen, click the ‘Preferences’ tab
- Click on the ‘Set Consultation Request Cutoff’ link at the bottom of the window
- Enter your desired Consultation Cutoff Time Warning
- Click Save
Set Consultation Request Warning Team

- In the appointment screen, click the ‘Preferences’ tab
- Click on the ‘Set Consultation Request Warning Team” link at the bottom of the window
- Select the team from the drop down menu
- Click Save
Set Workload Management

- In the appointment screen, click the ‘Preferences’ tab
- Click on the ‘Set Workload Management” link at the bottom of the window
- Select the billing type workload management list from the drop down menu
- Click Save
Set Paste Format in Consultation Request

- In the appointment screen, click the ‘Preference’ tab
- Click on the ‘Set Paste Format in Consultation Request” link at the bottom of the window
- Select either single or multi-line formats from the drop down menu, the existing setting will be shown
- Click Save
Set Default Consultations List View Options

- In the appointment screen, click the ‘Preference’ tab
- Click on the ‘Set Default Consultations List View Options” link
- Select either none mine or my group, the existing setting will be shown
- Click Save
Set Favourite eForm Group

- In the appointment screen, click the ‘Preference’ tab
- Select Set Favourite eFORM Group
- Select SAVE when finished
Set Default HC Type

- On the appointment Screen select the Preferences Tab
- Select the Province you wish to use as the default
- Click Save when finished
Set PHR Login ID

- On the appointment screen select the Preferences Tab
- Click on Set PHR Login
- Enter your desiried login information
- Submit when finished
Set to Use MyMeds

- On the appointment screen select the Preferences Tab
- Select Set to Use myMEDS
- Click the box
- Submit when finished
Configure eChart CPP

- On the appointment screen select the Preferences Tab
- Select Configure eCHART CPP
- Make the needed changes
- Save changes when you are finished making them
TIPS:
- This allows you to determine which portions of the Cumulative Patient Profile display and how.
OLIS Preferences

- On the appointment screen select the Preferences Tab
- Select OLIS Preferences
- Make the needed changes
- Save Changes when finished.
TIPS:
- The Ontario Laboratory Information System is a central database from which you can obtain laboratory reports for your patients with an Ontario health card. You can set some defaults for accessing this database here.
Dashboard User Preference

- On the appointment screen select the Preferences Tab
- Select Dashboard User Preference
- Select the default user
- Select if you want to share with the Ontario Common Dashboard (needs separate configuration)
- Set indicator refresh interval in minutes
- Save when finished.

Manage Comment Box When Acknowledging Labs

- On the appointment screen select the Preferences Tab
- Select Manage Comment Box when Acknowledging Labs
- Check the box if you want to select Disable Comment on Acknowledgement (TIP do this to prevent requiring a comment on every lab)
- Submit when finished.
Lab Recall Settings

- On the appointment screen select the Preferences Tab
- Select Lab Recall Settings
- Select the default delegate (it can be yourself) to whom the OSCAR message will be sent
- Set the default message subject
- Set if the default designate is to automatically assigned the tickler
- Set the default tickler priority
- Submit when finished.
Set Default Encounter Window Size

- On the appointment screen select the Preferences Tab
- Select Set Default Encounter Window Size (behavior will vary if you have set OSCAR to open in tabs) eg 1300 x 1100
- You can either set the encounter window to a given size or to maximize upon opening
- Submit when finished
TIP: You can put screen.availWidth or screen.availHeight if you only want the height or width maximized (i.e. width = 1400 and height = screen.availHeight)
Set Default Quick Chart Size

- On the appointment screen select the Preferences Tab
- Select Set Default Quick Chart Size
- Set the Number of Notes you want to be shown on the encounter screen eg 40
- Submit when finished.
TIPS:
- The encounter page has been optimized to open quicker by only loading the last twenty notes.
- It will open even quicker if you reduce the number
- if you often need to review more notes then increase the number
- you can always load the full chart by clicking on the “view full chart” link
Set to Enable Document Browser in Document Report (eDoc)

- On the appointment screen select the Preferences Tab
- Select Set to enable document browser in the document report
- Click on the box if you want to enable this function.
- Submit when finished.
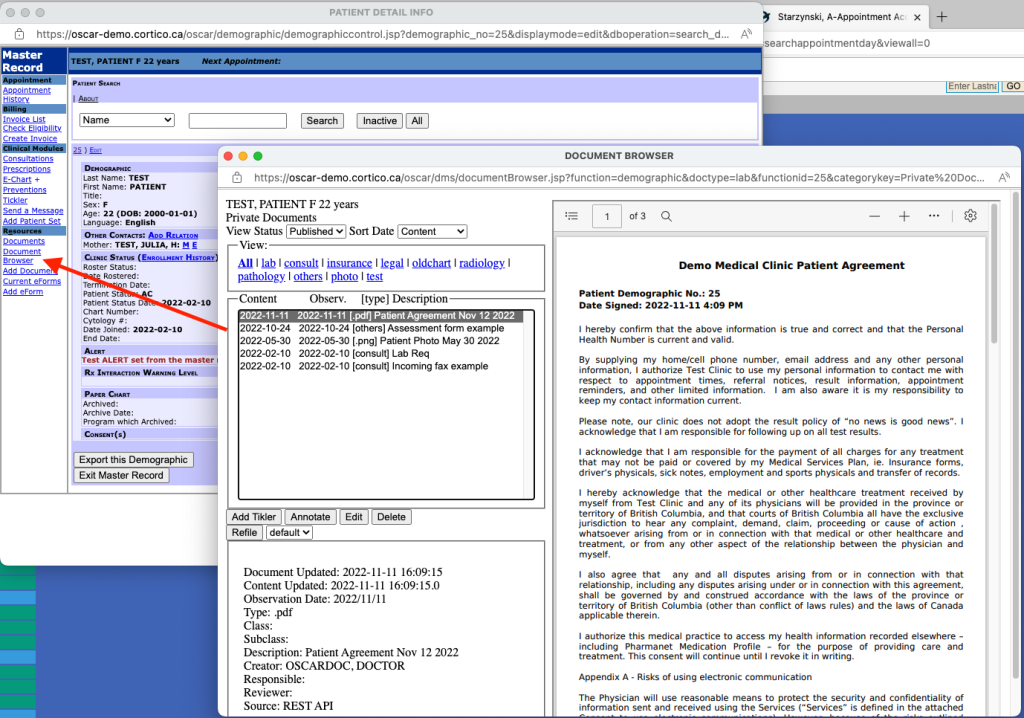
This is how the Document Browser feature looks when enabled:
Set to Enable Document Browser in Master Record – eDoc

- On the appointment screen select the Preferences Tab
- Select Set to enable document browser in Master Record
- Click on the box if you want to enable this function.
- Submit when finished.
Set Maximum Patient Name Length

- On the appointment screen select the Preferences Tab
- Select Set to enable document browser in the document report
- Click on the box if you want to enable this function.
- Submit when finished.
Set Document Description Template
![]()
- On the appointment screen select the Preferences Tab
- Select Set Document Description Template
- Click on the box if you want to enable this function.
- If not checked you can select your own default document description template
- Submit when finished.
Manage API Clients

- On the appointment screen select the Preferences Tab
- Select Manage API Clients
- Enter the all of the required data
- Submit when finished.
Set Display Document as PDF or Image

- On the appointment screen select the Preferences Tab
- Select Set Display Document as PDF or Image
- Choose either PDF or Image from the drop down box
- Submit when finished.
Enable New OSCAR User Interface (UI) – OBSOLETE
Hide Old eChart Link in Appointment – OBSOLETE
Set BORN Preferences (RBR/NDDS Prompts)

- On the appointment screen select the Preferences Tab
- Select Set BORN Preferences (RBR/NDDS Prompts)
- Click on the box if you want to disable this function.
- Save when finished.
Set Appointment Card Preferences

- On the appointment screen select the Preferences Tab
- Select Set Appointment Card Preferences
- Enter the data that is required.
- Submit when finished.
Set Prevention Preferences

- On the appointment screen select the Preferences Tab
- Select Set Prevention Preferences
- These preferences relate to the (optional) integration with DHIR
- Click on the box if you want to enable/disable these 3 different options
- Save when finished.
Set Clinical Connect Preferences

- On the appointment screen select the Preferences Tab
- Select Set Clinical Connect Preferences
- Click on the box if you want to enable/disable these 2 functions.
- Save when finished.
Set Lab Macros
Lab macros are available when viewing lab reports. If you setup Macros, you would use the “Macros” dropdown in the lab report to select your macro. The macro will do what is configured in preferences, i.e. set a lab comment and/or create a tickler directed to a specific user.
i.e. this how Macros dropdown in the lab report looks (when you click on it you will see the list of macros you configured in Preferences):
![]()

- On the appointment screen select the Preferences Tab
- Select Set Lab Macros
- A page will open with any existing macros
- Delete or edit the existing macros
- You an add a macro by supplying at a minimum the Name and Comment for the Lab
- Optionally you can send a tickler to a provider on the system and provide a tickler message and service date
- Save when done
Video by Peter Hutten-Czapski instructing on the use of Macros:
Set Default Tickler Task Assignee

- On the appointment screen select the Preferences Tab
- Select Set Tickler Preferences
- Leave it default or to the MRP or to a specific providere
- Save when finished.
Documentation Copyright © 2012-2024 by Peter Hutten-Czapski MD with additions from Adrian Starzynski under the Creative Commons Attribution-Share Alike 3.0 Unported License