HRM Tab
Hospital Report Manager
HRM is an eHealth solution that enables clinicians to securely receive patient reports electronically from participating hospitals and specialty clinics.
HRM electronically delivers text-based Medical Record reports, (e.g. Discharge Summary), and transcribed Diagnostic Imaging (excluding image) reports from sending facilities directly into patients’ chart, within OSCAR.
HRM Tab
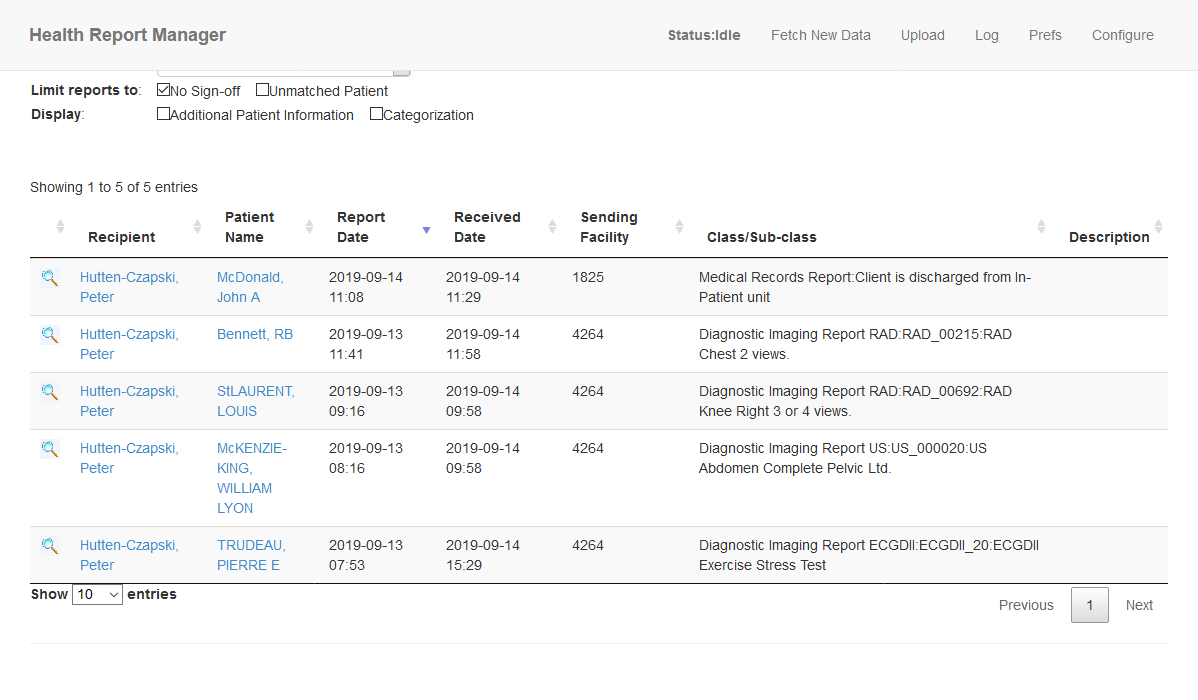 The HRM Tab opens a sortable list of reports filtered by default to those who have not yet been signed off for the logged in provider. The magnifying icon opens each report to allow for review and signoff
Fetch New Data
Clicking this link will refresh the inbox and pull any new reports
Transaction Log
The transaction log is useful for trouble shooting the connection
Preferences
Preferences
Creating Confidentiality Statement
Users can create a custom confidentiality statement that will be added on to all printed reports. To use this functionality, click on “Prefs” and enter the custom message in the text field and click “Save”
Outage Reports
During an outage, HRM administrators can opt out of receiving messages in their inbox when reports are unable to be downloaded by clicking on the following button (Figure 10). Once the outage has been resolved, the system will reset so that during the next outage administrators will receive the reports.

Configuration
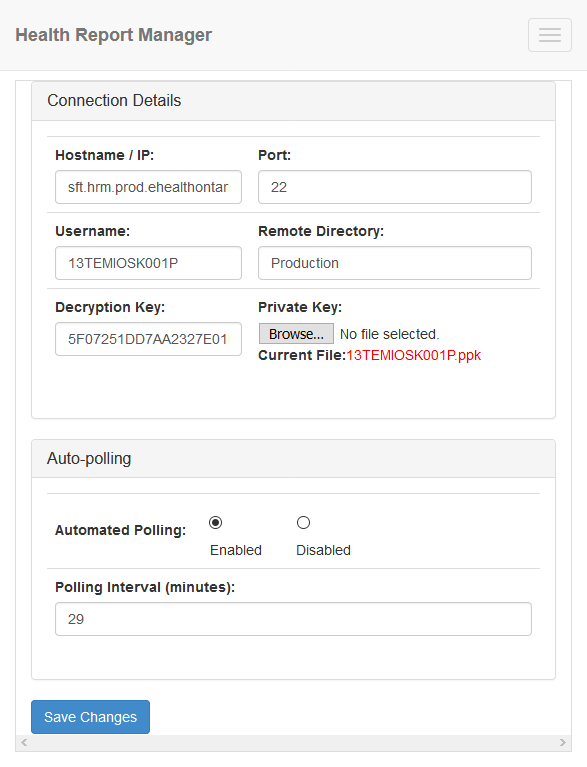
The HRM configuration “Configure” page allows you to input the credentials that you have received from OntarioMD. The private key can be uploaded with the Browse function. Take care not to share neither it nor the Decryption key.
The recommended polling interval is 30 minutes.
Any polling interval 60 min and over will poll hourly. A 0 minute setting turns it off although you can disable with the Automated Polling radio button. Administrators for the clinic will get automated notification by email if the clinic is set to receive HRM and no reports have been picked up in the previous day.
Categories
When a HRM report is downloaded, the system will automatically sort the report into a category. Users can create custom categories for reports to be sorted into.
To create a category click on the “Categories” link in the configuration menu and then use the form at the top to add a category. A sub-class name mnemonic will need to be associated with the category in order for the reports to be automatically sorted
Class Mappings
Class mappings will dictate how the HRM reports get sorted into the categories. In the configuration menu, click the “Class Mapping” link. Then click the “Add a class mapping” link on the Class Mappings page to open the “Add Mapping” Form (Figure 12).
 The fields required to add a mapping are as follows:
- Report Class: Can be set to either Medical Records Report, Diagnostic Imaging Report, or Cardio Respiratory Report
- Sub-class: The sub-class must be extracted from current data in the system (ie from examining a file in /usr/share/oscar-emr/OscarDocument/oscar/hrm/sftp-downloads/[date]/decrypted/ ) or from a list provided by a sending facility
- Sub-class mnemonic: The sub-class mnemonic must be extracted from current data in the system or from a list provided by a sending facility
- Sub-class description: A description of the sub-class
- Sending Facility ID (* for all): The ID for the facility that will be sending the reports.
- Category: Must be a category that already exists within the system or a custom category that has been created by the user